link
웹으로 어셈블리 보기Assembly(ARM binutils)
ARMv8-A Reference Manual | 출처: ARM
Arm Examples 암어셈블리 예제
Arm어셈블리 기초
ARM 어셈블리 가이드(ARM Assembly Guide 임베디드(2011. 12. 15. 14:12)
ARM 어셈블리 가이드(ARM Assembly Guide)
- 이 문서는 ARM Cortex A8을 기준으로 ARM Assembly 언어를 사용하는 방법에 대해서 다룹니다.C언어는 기본적으로 안다는 가정하에 ARM 어셈블리 이해를 돕기 위하여 C언어의 문법과 연결시켜 설명을 할 것입니다.
- [출처] ARM 어셈블리 가이드(ARM Assembly Guide|작성자 권과장11 https://blog.naver.com/gangst11/145839687
- 이 문서는 ARM Cortex A8을 기준으로 ARM Assembly 언어를 사용하는 방법에 대해서 다룹니다.C언어는 기본적으로 안다는 가정하에 ARM 어셈블리 이해를 돕기 위하여 C언어의 문법과 연결시켜 설명을 할 것입니다.
어셈블러의 비교
hello Arm
;
;  Assembler program to print "Hello World!"
;  to stdout.
;
;  X0-X2 - parameters to linux function services
;  X16 - linux function number
.global _start             ;  Provide program starting address to linker
.align 4

;  Setup the parameters to print hello world
;  and then call Linux to do it.

_start:
    mov X0, #1     ;  1 = StdOut
    adr X1, helloworld ;  string to print
    mov X2, #13     ;  length of our string
    mov X16, #4     ;  MacOS write system call
    svc 0     ;  Call linux to output the string

;  Setup the parameters to exit the program
;  and then call Linux to do it.

    mov     X0, #0      ;  Use 0 return code
    mov     X16, #1     ;  Service command code 1 terminates this program
    svc     0           ;  Call MacOS to terminate the program

helloworld:
    .ascii  "Hello World!\n"
macOS version history
Darwin(Operating System)
AT&T Unix System V
xcrun오류 해결 (XCode를 설치해야한다)
xcrun: error: invalid active developer path (/Library/Developer/CommandLineTools), missing xcrun at: /Library/Developer/CommandLineTools/usr/bin/xcrun- Fortunately, there is an easy solution to that — just install, or reconfigure, the Xcode toolkit. You can either download it from the Appstore, from the Apple Developer download section, or you can install it via the Terminal:
$ xcode-select --install- If you already have it installed and need to reset it, you can do the following (you probably need sudo rights to do that):
$ sudo xcode-select --resetmacOS c-linking error & 폴더
- Clang linking error MacOS Big Sur
export LDFLAGS=-L/Library/Developer/CommandLineTools/SDKs/MacOSX.sdk/usr/lib
make  # or cmake .
macOS dev.포럼 궁금한거 해결하기
ARMv4 through 7 syntax highlighting for vim
VSCode Extension(Arm® assembly highlighting for Visual Studio Code)
네오빔(NeoVim)assembly(asm-lsp)
- NeoVim(TSInstall)
:TSInstall asm- Vim _ Assembly Highlight Syntax
:set ft=nasm " assembly highlight syntax- NeoVim(asm-lsp)
- https://www.reddit.com/r/neovim/s/XAuQM98VY6
- https://github.com/bergercookie/asm-lsp
- Using cargo
- Install using the cargo package manager, either from crates.io or from github:
- Using cargo
- https://github.com/bergercookie/asm-lsp
- https://www.reddit.com/r/neovim/s/XAuQM98VY6
cargo install asm-lsp
# or to get the latest version from github
cargo install --git https://github.com/bergercookie/asm-lsp
Vim
Installation
Copy the syntax folder into your
~/.vimfolderwith Plug
Plug 'ARM9/arm-syntax-vim'or with Pathogen
Clone this repo into your
~/.vim/bundledirectory.
git clone https://github.com/ARM9/arm-syntax-vim.git- Using
- In your .vimrc:
au BufNewFile,BufRead *.s,*.S set filetype=arm " arm = armv6/7

au BufNewFile,BufRead *.s,*.S, *.asm set filetype=arm " arm = armv6/7- or add this line at the top or bottom of your assembly file(s):
@ vim:ft=armv5Markdown code block keywords used by Discord
Mara Bos
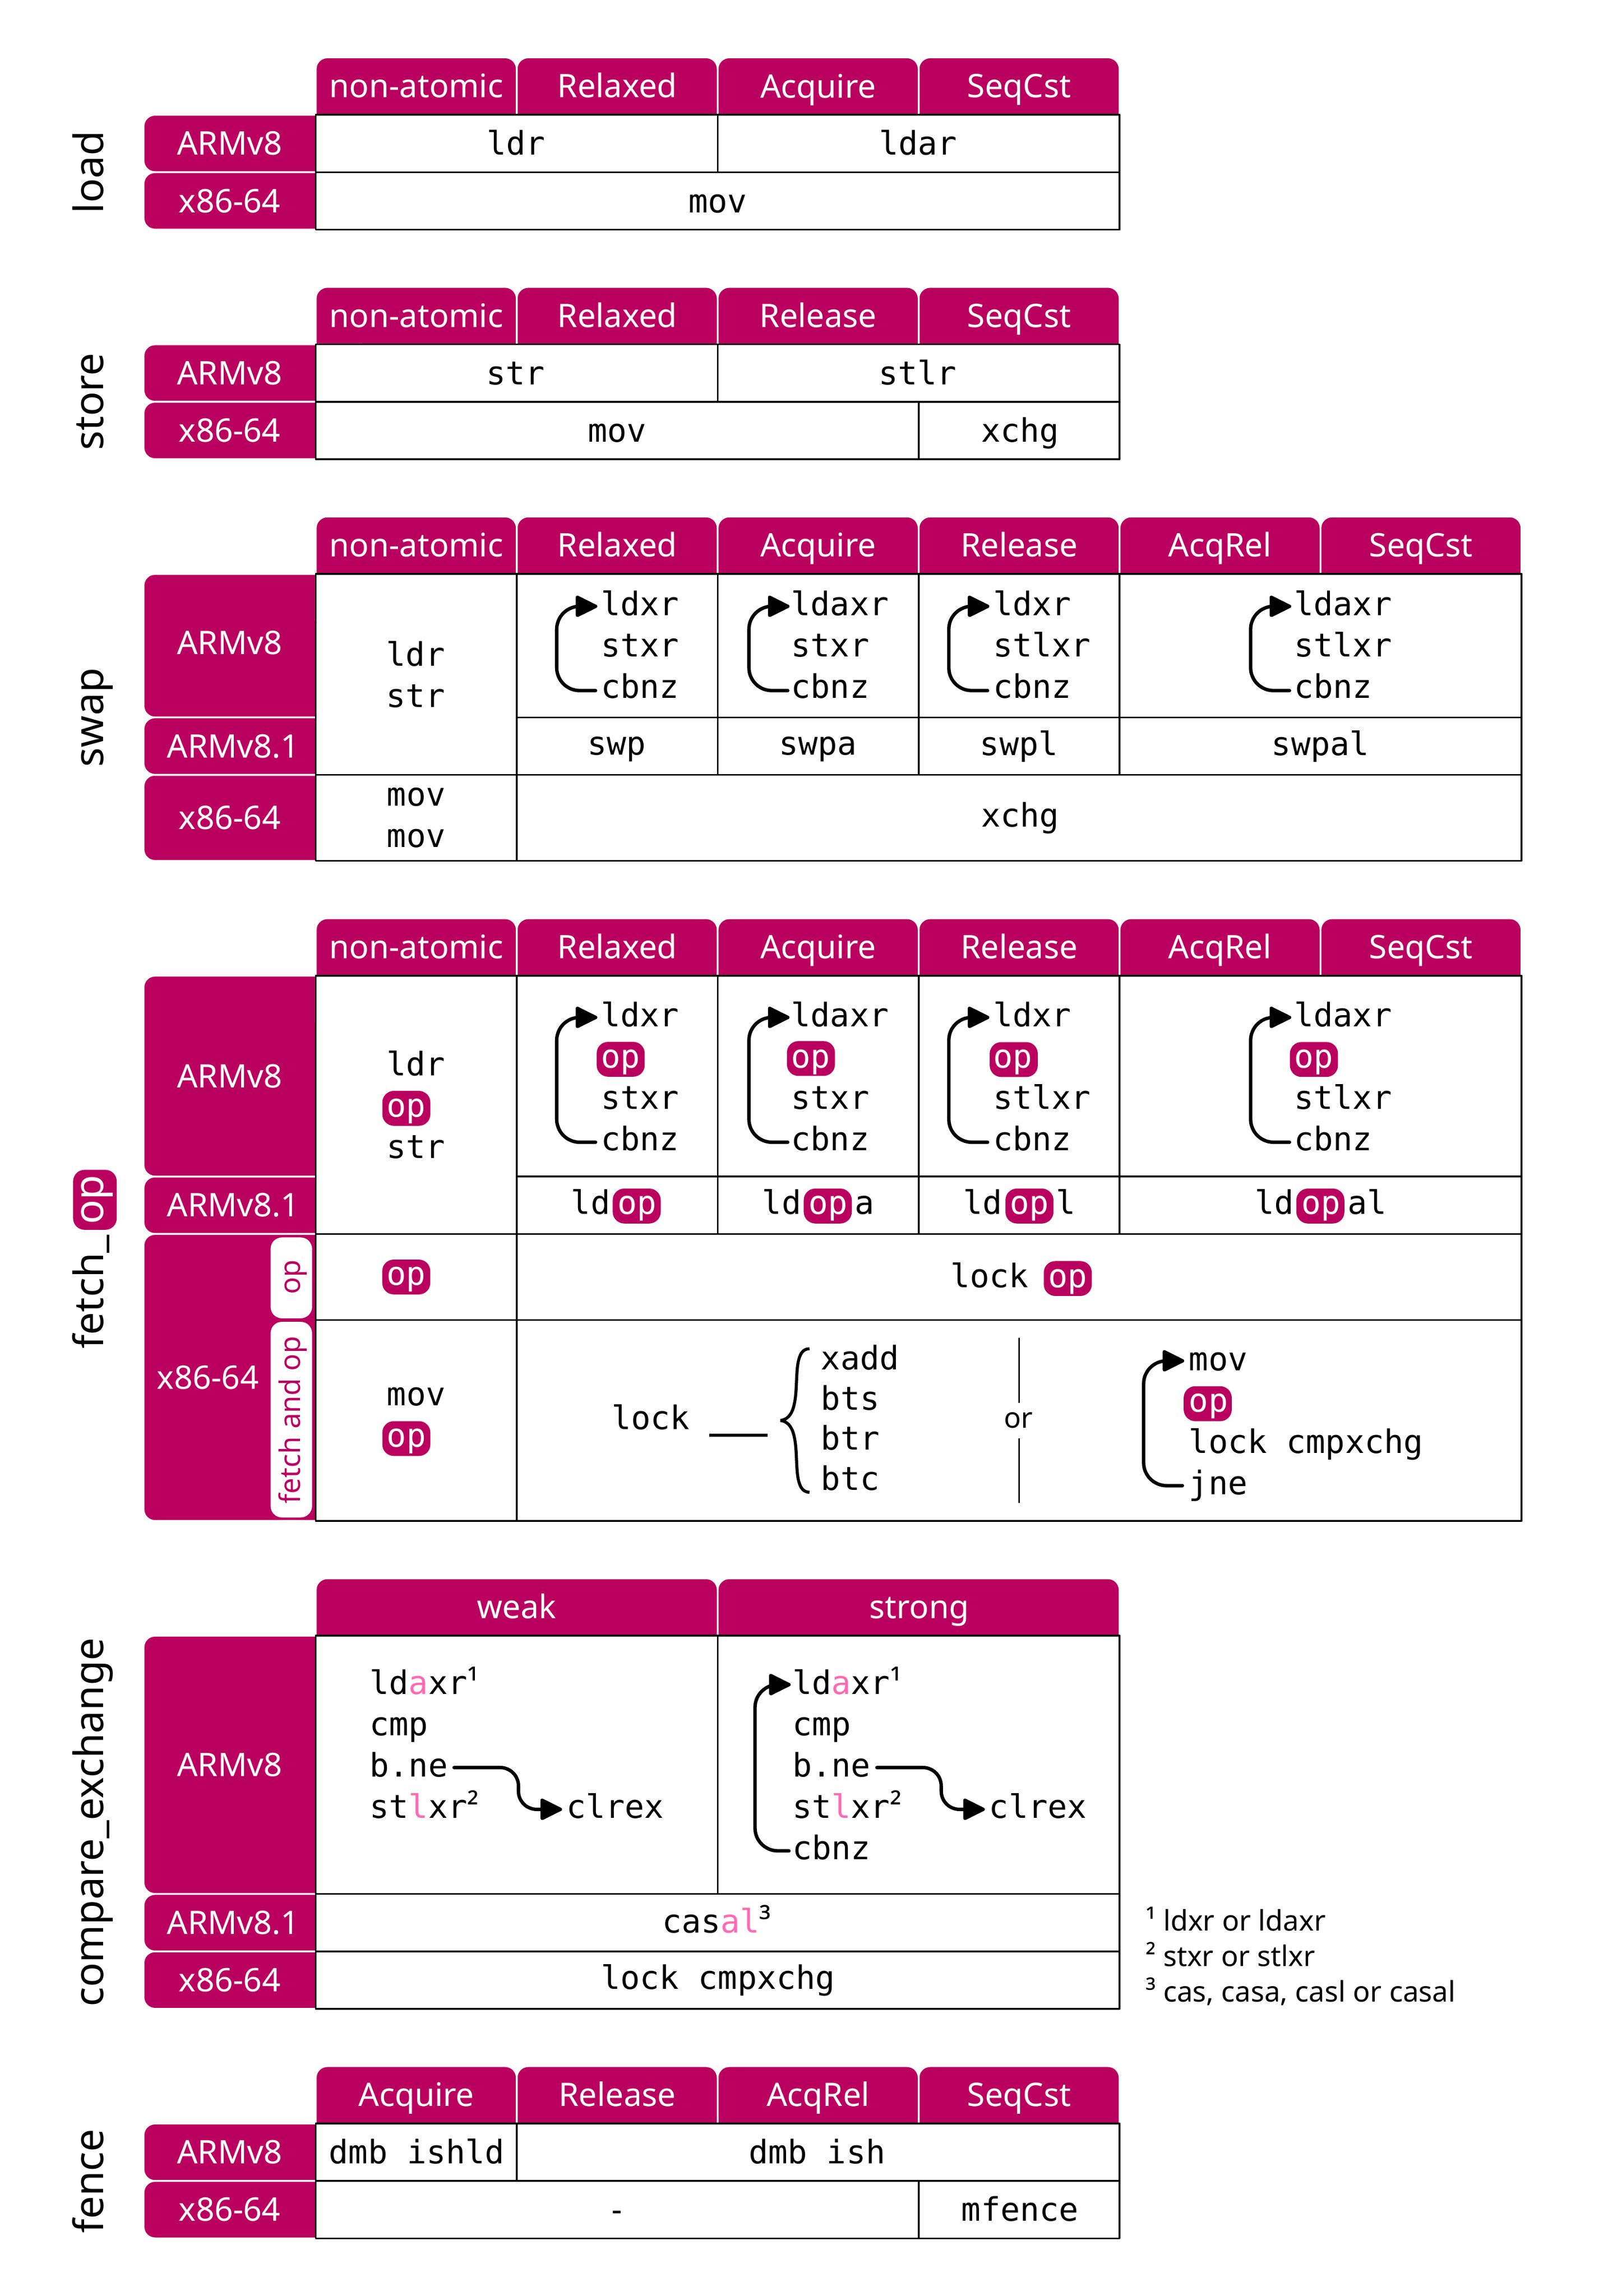
@m_ou_se ⚛️📋 I made an overview of the ARMv8 and x86-64 machine instructions for all the common atomic operations:
예제로 어셈블리 익히기(arm assembly)
ARM Assembly Basics Tutorial Series:
https://azeria-labs.com/writing-arm-assembly-part-1/
ARM Assembly Basics Tutorial Series:
- Part 1: Introduction to ARM Assembly
- Part 2: Data Types Registers
- Part 3: ARM Instruction Set
- Part 4: Memory Instructions: Loading and Storing Data
- Part 5: Load and Store Multiple
- Part 6: Conditional Execution and Branching
- Part 7: Stack and Functions
A Guide to ARM64 / AArch64 Assembly on Linux with Shellcodes and Cryptography
겁나게 쉽게 배우는 Arm Assembly | you can learn assembly FAST with this technique (arm64 breakdown) | Low Level Learning
https://youtu.be/vhyettT7sdA?si=LQ2AN5XeS5M8kJJ_
[Armv7] CPSR 컨디셔널 비트 확인 디버깅 실습 (TRACE32)
’디버깅을 통해 배우는 리눅스 커널의 구조와 원리’ 책 강의 동영상
https://www.youtube.com/playlist?list=PLRrUisvYoUw9-cTYgkbTbr9f9CpbGdq4F
rust_웹으로 어셈블리 보기Assembly
Arm64_Assembly_Language
내가 공부하려고 만든 영상
한글강의Assembly언어001_ld_as_C언어_Assembly언어로 변환 #assembly https://youtu.be/9yt1Enp4EwU
영상 모아 보기
https://youtube.com/playlist?list=PLcMveqN_07mY7DpIaeGGXfnctSwzZSOgG
arm64 assembly crash course
https://github.com/Siguza/ios-resources/blob/master/bits/arm64.md
How register is encoded in an ARM64 mov instruction? 변환 할 때 조심해야할 사항 https://stackoverflow.com/questions/65233207/how-register-is-encoded-in-an-arm64-mov-instruction
GNU and LLVM tools get this right: aarch64-linux-gnu-objdump -d shows 528c4102, the 32-bit integer interpretation of the 4 bytes. llvm-objdump -d shows 02 41 8c 52, the raw byte sequence. Both of those are equivalent and not misleading.
But https://armconverter.com/ stupidly groups it up into 02418C52 (in its default “GDB” mode). This is bad. If you wanted to manually encode some AArch64 shellcode, you’d use .long 0x528c4102 (on a little-endian assembler targeting e.g. like x86, AArch64, or whatever) to get a representation of MOVZ W2, #0x6208.
By convention, a single string of digits without spaces has place-values that increase from right to left, and represent a single integer value of some width. It’s not you, it’s https://armconverter.com/ that’s the problem.
armconverter has a “GDB/LLDB” toggle that fixes it to 528C4102 in LLDB mode, which it calls “big endian”. But it’s not a “big endian” byte sequence, there are no spaces so it’s the 32-bit integer value. 02418C52 is the integer you’d get if you interpret the 4 bytes as big-endian (opposite of what an AArch64 CPU does), 528C4102 is the correct little-endian interpretation of those 4 bytes.
I think armconverter is using “big endian” to actually mean “byte reverse before removing spaces between bytes”. This is braindead misuse of terminology. Again, both GNU binutils and LLVM disassemblers get this right, the problem is purely armconverter
How to Read ARM64 Assembly Language
https://wolchok.org/posts/how-to-read-arm64-assembly-language/
C to Assembly
- MIT 영상 MIT OpenCourseWare
clang 으로 LLVM IR Code 로 우선 변환
$ clang -S -emit-llvm fib.cfib.c 가 fib.ll 변환됨
변환 된 fib.ll파일을 fib.s 어셈블리 파일로 다시 변환
$ clang fib.ll -S// 링크로 연결해서 실행 파일 만들기
$ ld -macosx_version_min 12.0.0 -o fib fib.o -lSystem -syslibroot `xcrun -sdk macosx --show-sdk-path` -e _main -arch arm64
C 언어 다르게 Assembly 변환하기
Basic Structure of C Program in Hindi: C Tutorial In Hindi #4
main.s —> Assembly file
$ gcc -Wall -save-temps main.c

$ ls

a.out   main.bc main.c  main.i  main.o  main.s
otool 활용법 macOS 쓰는 툴
// otool 을 이용해 Assembly 코드를 볼 수 있다.

$ otool -tv fib
otool 활용법(macOS)
Comparing C to machine language
https://www.youtube.com/watch?v=yOyaJXpAYZQ
❤️❤️❤️ Shellcode for macOS on M1 chips - Part 1: Quick overview of ARM64 assembly language ❤️
Shellcode for macOS on M1 chips - Part 1: Quick overview of ARM64 assembly language
objdump 활용법
.o 오브젝트 파일 만든 후
objdump -d fib.o
objdump 예시 파일
objdump -d fib.o

fib.o:	file format mach-o arm64

Disassembly of section __TEXT,__text:

0000000000000000 <ltmp0>:
       0: ff 83 00 d1  	sub	sp, sp, #32
       4: fd 7b 01 a9  	stp	x29, x30, [sp, #16]
       8: fd 43 00 91  	add	x29, sp, #16
       c: e0 0b 00 b9  	str	w0, [sp, #8]
      10: e8 0b 40 b9  	ldr	w8, [sp, #8]
      14: 08 09 00 71  	subs	w8, w8, #2
      18: aa 00 00 54  	b.ge	0x2c <ltmp0+0x2c>
      1c: 01 00 00 14  	b	0x20 <ltmp0+0x20>
      20: e8 0b 40 b9  	ldr	w8, [sp, #8]
      24: a8 c3 1f b8  	stur	w8, [x29, #-4]
      28: 0e 00 00 14  	b	0x60 <ltmp0+0x60>
      2c: e8 0b 40 b9  	ldr	w8, [sp, #8]
      30: 00 05 00 71  	subs	w0, w8, #1
      34: f3 ff ff 97  	bl	0x0 <ltmp0>
      38: e0 07 00 b9  	str	w0, [sp, #4]
      3c: e8 0b 40 b9  	ldr	w8, [sp, #8]
      40: 00 09 00 71  	subs	w0, w8, #2
      44: ef ff ff 97  	bl	0x0 <ltmp0>
      48: e0 03 00 b9  	str	w0, [sp]
      4c: e8 07 40 b9  	ldr	w8, [sp, #4]
      50: e9 03 40 b9  	ldr	w9, [sp]
      54: 08 01 09 0b  	add	w8, w8, w9
      58: a8 c3 1f b8  	stur	w8, [x29, #-4]
      5c: 01 00 00 14  	b	0x60 <ltmp0+0x60>
      60: a0 c3 5f b8  	ldur	w0, [x29, #-4]
      64: fd 7b 41 a9  	ldp	x29, x30, [sp, #16]
      68: ff 83 00 91  	add	sp, sp, #32
      6c: c0 03 5f d6  	ret

0000000000000070 <_main>:
      70: ff 03 01 d1  	sub	sp, sp, #64
      74: fd 7b 03 a9  	stp	x29, x30, [sp, #48]
      78: fd c3 00 91  	add	x29, sp, #48
      7c: 08 00 80 52  	mov	w8, #0
      80: a8 43 1f b8  	stur	w8, [x29, #-12]
      84: bf c3 1f b8  	stur	wzr, [x29, #-4]
      88: 08 05 80 52  	mov	w8, #40
      8c: a8 83 1f b8  	stur	w8, [x29, #-8]
      90: a9 83 5f b8  	ldur	w9, [x29, #-8]
      94: e8 03 09 aa  	mov	x8, x9
      98: e8 0f 00 f9  	str	x8, [sp, #24]
      9c: a0 83 5f b8  	ldur	w0, [x29, #-8]
      a0: 00 00 00 94  	bl	0xa0 <_main+0x30>
      a4: e8 0f 40 f9  	ldr	x8, [sp, #24]
      a8: ea 03 00 aa  	mov	x10, x0
      ac: 00 00 00 90  	adrp	x0, 0x0 <_main+0x3c>
      b0: 00 00 00 91  	add	x0, x0, #0
      b4: e9 03 00 91  	mov	x9, sp
      b8: 28 01 00 f9  	str	x8, [x9]
      bc: e8 03 0a aa  	mov	x8, x10
      c0: 28 05 00 f9  	str	x8, [x9, #8]
      c4: 00 00 00 94  	bl	0xc4 <_main+0x54>
      c8: a0 43 5f b8  	ldur	w0, [x29, #-12]
      cc: fd 7b 43 a9  	ldp	x29, x30, [sp, #48]
      d0: ff 03 01 91  	add	sp, sp, #64
      d4: c0 03 5f d6  	ret
실행 파일 만들어서 하는 방법
./fib 실행 파일 만들고 명령어
$ otool -tv fib$ otool -tv fib
fib:
(__TEXT,__text) section
_fib:
0000000100003ec4 sub sp, sp, #0x20
0000000100003ec8 stp x29, x30, [sp, #0x10]
0000000100003ecc add x29, sp, #0x10
0000000100003ed0 str w0, [sp, #0x8]
0000000100003ed4 ldr w8, [sp, #0x8]
0000000100003ed8 subs w8, w8, #0x2
0000000100003edc b.ge 0x100003ef0
0000000100003ee0 b 0x100003ee4
0000000100003ee4 ldr w8, [sp, #0x8]
0000000100003ee8 stur w8, [x29, #-0x4]
0000000100003eec b 0x100003f24
0000000100003ef0 ldr w8, [sp, #0x8]
0000000100003ef4 subs w0, w8, #0x1
0000000100003ef8 bl _fib
0000000100003efc str w0, [sp, #0x4]
0000000100003f00 ldr w8, [sp, #0x8]
0000000100003f04 subs w0, w8, #0x2
0000000100003f08 bl _fib
0000000100003f0c str w0, [sp]
0000000100003f10 ldr w8, [sp, #0x4]
0000000100003f14 ldr w9, [sp]
0000000100003f18 add w8, w8, w9
0000000100003f1c stur w8, [x29, #-0x4]
0000000100003f20 b 0x100003f24
0000000100003f24 ldur w0, [x29, #-0x4]
0000000100003f28 ldp x29, x30, [sp, #0x10]
0000000100003f2c add sp, sp, #0x20
0000000100003f30 ret
_main:
0000000100003f34 sub sp, sp, #0x40
0000000100003f38 stp x29, x30, [sp, #0x30]
0000000100003f3c add x29, sp, #0x30
0000000100003f40 mov w8, #0x0
0000000100003f44 stur w8, [x29, #-0xc]
0000000100003f48 stur wzr, [x29, #-0x4]
0000000100003f4c mov w8, #0x28
0000000100003f50 stur w8, [x29, #-0x8]
0000000100003f54 ldur w9, [x29, #-0x8]
0000000100003f58 mov x8, x9
0000000100003f5c str x8, [sp, #0x18]
0000000100003f60 ldur w0, [x29, #-0x8]
0000000100003f64 bl _fib
0000000100003f68 ldr x8, [sp, #0x18]
0000000100003f6c mov x10, x0
0000000100003f70 adrp x0, 0 ; 0x100003000
0000000100003f74 add x0, x0, #0xfa8 ; literal pool for: "fib(%d) %d \n"
0000000100003f78 mov x9, sp
0000000100003f7c str x8, [x9]
0000000100003f80 mov x8, x10
0000000100003f84 str x8, [x9, #0x8]
0000000100003f88 bl 0x100003f9c ; symbol stub for: _printf
0000000100003f8c ldur w0, [x29, #-0xc]
0000000100003f90 ldp x29, x30, [sp, #0x30]
0000000100003f94 add sp, sp, #0x40
0000000100003f98 retGod-Tier Developer Roadmap
God-Tier Developer Roadmap | Fireship
자료 정리함
C코드를 ll로 변환 후 Assembly ❤️바꾸는 방법(LLVM&Assembly코드는 M1pro arm64기계 기준임macOS)otool활용
출처: https://economiceco.tistory.com/14882 [경제PLUS:티스토리]